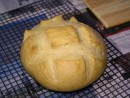
French Boule
Time required:
Start pre-ferment the day before baking. To make pre-ferment (also called pate fermentée):
If you're using active dry yeast (for example, Fleischman), dissolve the yeast in the water and wait a few minutes. The water should become bubbly/sudsy, a sign that the yeast is alive. This step is also called "proofing" the yeast, that is, proving that the yeast is alive. If you're using instant yeast, just mix everything together (hence, "instant"). Mix everything together in mixer with the paddle attachment, or by hand in a big bowl with a big spoon. You only need to mix until everything is well blended; there is no need to knead the dough. The dough should have the consistency of very heavy pancake batter, that is, not quite flowy, but way too wet to handle by hand. Let sit at room temperature for about an hour, then fold the dough a few times (with a spatula) and put it in the fridge for many hours; I usually leave it in the fridge for at least 24 hours. This allows the yeast to work on on the starch and produce simple sugars. The cold temperature slows down that process, which results in different, more complex & better flavors. Bread, first rise: Next day: to make bread: take pre-ferment out of fridge, and add the following:
Again, "proof" the yeast if using active dry yeast. In a mixer with dough hook, mix everything together on medium speed for 10 minutes. By hand, here are two good methods: Form the dough into a ball and cover loosely with plastic wrap, or with a damp cloth napkin/dish towel. Let it rise/ferment in a warm place for 60 minutes. I put the dough ball into a cold oven, turn it on to 350' for 30 seconds, then turn it off, which leaves the oven at about 80-85'. The dough should at least double in size. Bread, second rise: At the end of the first rise, form the dough into a ball-shaped loaf and let the loaf do its second rise, similar to this: Put the dough ball on a square of parchment paper on a rimless cookie sheet; you will use the cookie sheet as a "peel" to put both paper & dough into the oven. Cover the dough loosely plastic wrap, or with a damp cloth napkin/dish towel, and let the dough rise for 30 minutes.
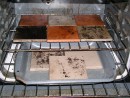
Turn on the oven, set it to 375'. I use six quarry tiles on the top rack, and a heavy baking tray with three quarry tiles on another rack immediately below that. I bought my quarry tiles at Home Depot. You need to have the tiles in the oven at this point, to heat them up.
Baking: Have a cup of hot water ready. At the end of the second rise, make slashes on the dough ball's top in a cross hatch pattern. Open the oven, put the loaf in (slide the parchment paper off of the rimless cookie sheet onto the quarry tiles), pour the hot water into the tray (containing the three quarry tiles) and quickly close the oven. Bake for 15 minutes. Do NOT open the oven during this time, or you will lose the steam and the bread won't have a decent crust. After 15 minutes, rotate the loaf 180' and bake for another 15 minutes. Then turn the loaf upside down and bake for another 15 minutes. Then turn the loaf 180' (still upside down) and bake for another 12 minutes. The loaf is done if rapping on it produces a hollow sound, not a soggy or dense sound. Or, if you have an instant-read thermometer, check that the cetner of the loaf has reached at least 205-210'. Remove the loaf from the oven and let cool on a wire rack for at least half an hour before tearing into it :) . NOTE 1: I prefer to do the last step for only 8 minutes instead of 12 minutes, so the loaf will be slightly underbaked. Its crust will go soft within hours after removed from the oven, but the loaf will stay moist/soft longer and and keep longer (in a sealed plastic bag) and yields better toast. If you eat the loaf within a day, then by all means do the full 12 minutes (or more) in the last step, which will produce a thicker crust as well as remove more moisture from the crumb so that the loaf's crust will stay crunchy for a long time. The flip side is that a loaf baked longer will dry out quicker. NOTE 2: I re-use the parchment paper. It's good for 5-6 uses before it gets too brown and brittle.
|
|
[ Email me ]
[ Updated: Apr 12, 2010 ] |